Step 3
Required Equipment
- Drill
- Rivet Gun
- Files
- De-Burring Tool
- Cleco Pins
- Sharpie (Marker)
- Cleco Clamps
- Cleco Pliers
Step 3 involves attaching the floor panel to the steel frame and is really the first of the permanent attachment steps, so care should be taken to ensure everything is correctly aligned before final assembly.
The first thing to do is place the frame on its side at a suitable working height. Bear in mind that the main strut support bracket will need to overhang the edge of the bench so that the frame can lay flat on the surface. Once the main frame is at a comfortable working hight, use cleco clamps to secure the floor skin, G000269, roughly in the correct position over the frame.
Now that the floor panel is roughly in position, it is time locate it properly so that each rivet securing the panel to the steel frame has an adequate edge distance. (NO LESS than 1x diameter of the rivet from the edge of the cross-member tubing).This may seem like a long and tedious process, but it is one of the main structural panels so its integrity is important.
How you want to achieve the proper locating of the floor panel is up to the builder, however we achieved it by tracing the steel frame onto the inside of the floor panel whilst it was clamped roughly in position. Once all the cross members were traced onto the panel, it was removed and the pre drilled holes were compared to the traced lines. Any holes that did not have adequate edge distance to the traced lines were noted and then the floor panel was once again clamped into a position that was slightly adjusted to take into account the hole positioning noted during the initial tracing. This process was repeated until all of the holes had an adequate edge distance on the frame. It is important to note that the pre-drilled holes are undersize and when calculating your edge distance, you need to use the diameter of the rivet and not the pre-drilled holes.
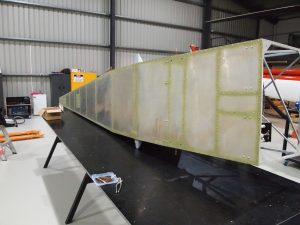
Floor riveted in place. Notice that the strut mounting flange prevents the frame from sitting flat on the bench
Once happy with the location and alignment of the floor panel, it is time drill it off for riveting. This process is quite time consuming as you are drilling through chromoly which is particularly hard, especially in welded areas. The hardness of the material also means you will most likely go through several drill bits before the process is completed, so make sure you have spares.
Starting in one corner, start drilling off the floor panel to the frame. Using an undersize drill (3/32), drill every 6-10 holes in a sort of diagonal manner. i.e don’t drill one edge in its entirety and then another edge, but rather drill along one edge for a few holes, then down the other and the cross members as required, working your way to the diagonally opposite corner of the floor panel. Install cleco pins as you go to keep the panel tight against the frame and continually check the position of your floor panel to ensure that it doesn’t creep or gather excess material between rivet holes.
Once you have drilled and pinned the floor panel with the 6 – 10 hole spacing, it should be fairly secure and you can proceed to drilling all the holes off, pinning it with clecos around every 2 or 3 holes. Once all holes have been drilled to 3/32, you will need to repeat the process using 1/8 drill and Clecos.
With the floor panel drilled and held in place with 1/8 Clecos, the holes for the landing gear, brake lines and pedals need to be drilled into the panel. This is achieved by back drilling from inside the cabin (Refer to the GTCM for hole sizes), although the holes to allow the brake lines to go through the floor are not indicated in the GTCM so you will need to determine a suitable position for them and drill them to a size that will accomodate a rubber grommet of the appropriate size. You may find it more practical to leave these holes until a later date which is totally fine.
Before de-burring can be done, there is one last bit of drilling. In the GTCM, it tells you to not rivet the area of the rearmost crossmember (This is where the tail section meets with the cabin section and shares these holes), however when it does come time to rivet them, you will find it tells you to rivet them with 4mm (5/32) rivets so it is easier just to drill those holes, on the rear most crossmember, out to 5/32 at this point in time.
It is now time for de-burring, prep and prime, with a de-burring tool and a file, de-burr all holes and edges of the floor panel removing any stress raisers and repeat the process for holes in the frame.
Once the floor panel has been de-burred, prepare it with Alodine and apply primer. We also chose to put our top coat on the inside of the floor panel, as once this is riveted into place, there is no additional work required on it. Obviously with top coat applied, extra care must be taken to prevent it from being scratched or scuffed when undertaking other tasks in the cabin area.
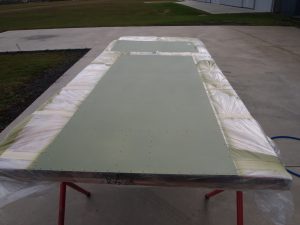
Floor panel primed and ready for fitment
So now that that the floor panel and frame have been drilled, de-burred and painted/primed, it is time to nail that thing home. Apply a bead of PR1422 (proseal) to the faying surfaces of the frame and pin the floor panel in place using the Cleco’s on every second hole. Install the rivets in the holes that are not pinned, then remove the pins and install rivets in the remaining holes. Bear in mind to leave the aft crossmember unriveted as this happens at a later stage, this also means that it should not have proseal applied either.
One thing that probably should be considered before you go ahead and starting sending your rivets home is the possibility of dissimilar metal corrosion between the aluminium rivets and the chromoly frame. To avoid this as much as possible, we alodined our rivets and installed them with wet primer. You could also dip the rivets in proseal and this will achieve a similar level of protection also.
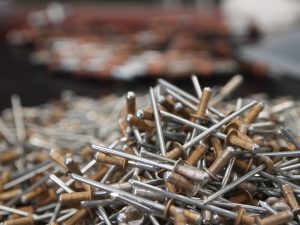
We alodined the rivets in one whole batch. Notice the gold colour the aluminium turns when prepped with alodine. Ideally you don’t want that much colour, it just means they were in the alodine for a little too long.
Once this step is completed, you can flip the frame right side up, crack a beer and think about the next step
Happy Building…..
Recent Comments